

Table of Contents
- Understanding Tool-Free Assembly Mechanisms
- What You'll Need Before You Start
- How to Assemble Furniture Without Tools: Step-by-Step Process
- Tool-Free Furniture Assembly in Australia: What's Available
- IKEA Tool-Free Assembly Options and Ready-to-Assemble Alternatives
- Furniture Assembly Hacks: DIY Solutions When Tools Are Missing
- Modular Furniture Australia: Flexibility and Easy Disassembly
- Ergonomic Assembly Techniques and Safety Tips
How to Assemble Furniture Without Tools: A Complete Guide
Last Updated: July 27, 2026
Learning how to assemble furniture without tools has become increasingly practical, thanks to innovations in interlocking joints, snap-together systems, and click connectors that make setup faster and genuinely enjoyable. At The Family Nest, we've seen firsthand how tool-free furniture transforms the moving experience for renters and frequent relocators. This guide covers everything you need to know about assembling furniture without tools, from understanding how interlocking joints work to troubleshooting common assembly problems.
Understanding Tool-Free Assembly Mechanisms
Tool-free furniture assembly relies on engineering rather than fasteners. Instead of screws, bolts, or nails, manufacturers use interlocking components, friction fits, and geometric precision to create joints that are both strong and easy to assemble. The result is furniture that feels solid once assembled, even though you never touched a power tool.
How Interlocking Joints Work
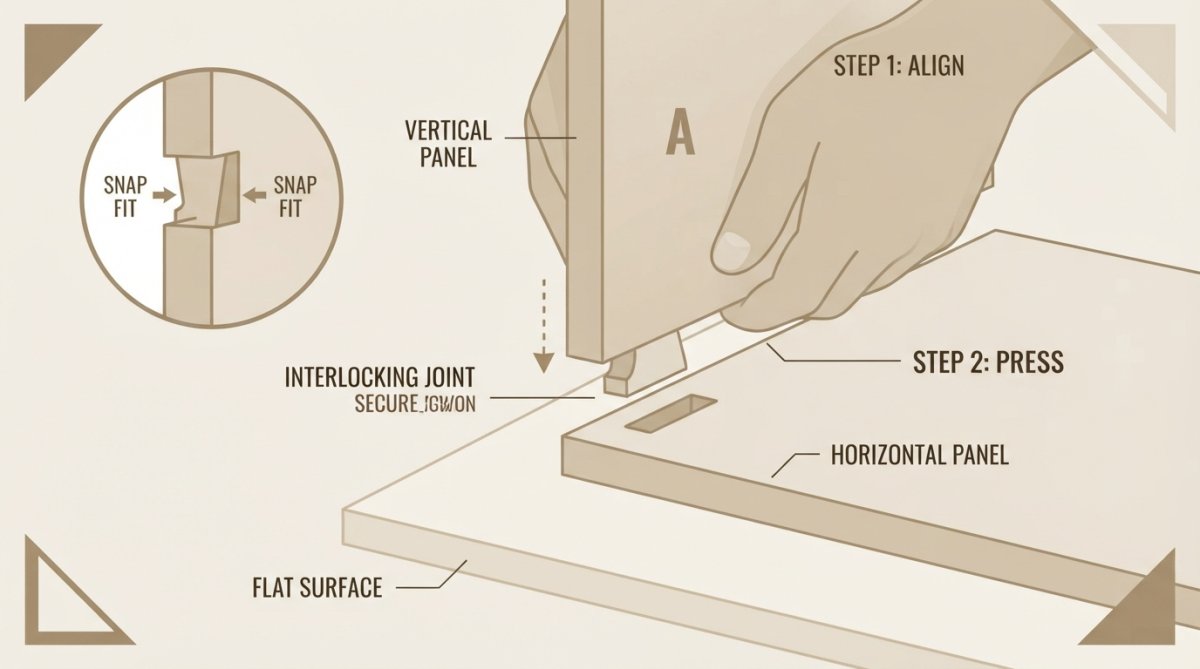
Interlocking joints function like a three-dimensional puzzle. One component has a protruding tongue or tab; the other has a corresponding slot or groove. When you slide or angle one piece into the other, the geometry locks them together. The strength comes from the fact that the connection resists movement in multiple directions.
Most interlocking joints are colour-coded or clearly labelled with numbers to show the assembly sequence. Once you've done it once, the process becomes second nature.
Clips, Tabs, and Snap-Together Systems
Clips and tabs create a mechanical lock when you press or click components together. Some use a simple friction fit where the tab is slightly oversized, requiring firm pressure to insert. Others use a spring-loaded mechanism that audibly clicks when fully engaged, giving you immediate confirmation that the joint is secure.
Snap-together systems are particularly popular in modern flat-pack furniture because they're fast and require minimal instruction. You align the components, apply steady pressure, and the clip snaps into place.
What You'll Need Before You Start
Despite the name, tool-free assembly doesn't mean you need absolutely nothing. A few simple items make the process smoother and safer.
Essential items:
- A clean, flat surface at least 1.5 metres square
- Your instruction manual (printed or digital on your phone)
- A helper for larger pieces (optional but recommended)
- A soft cloth or towel to protect furniture surfaces
- A spirit level to check alignment and stability
Optional but helpful:
- A rubber mallet or soft hammer (for gently seating stubborn joints)
- Work gloves to protect your hands and improve grip
- A small flashlight if assembling in dim lighting
- Masking tape to mark alignment points
The spirit level is genuinely useful. After assembly, checking that your furniture is level ensures stability and prevents drawers from sliding open on their own.
How to Assemble Furniture Without Tools: Step-by-Step Process
The process of assembling furniture without tools follows a logical sequence. Each step builds on the previous one, and skipping ahead usually creates problems.
Step 1: Prepare Your Assembly Space
Your assembly area matters more than most people realise. Clear a space large enough to lay out all components without them touching or overlapping. Ideally, your surface should be clean, flat, and hard, a tile floor or wooden deck works better than carpet, which can hide small hardware and make it harder to slide components smoothly.
Check your floor for levelness using a spirit level. If your floor is significantly uneven, place shims or thin cardboard under the furniture's feet to compensate. Lay out all components in the order they'll be assembled, using the instruction manual's exploded diagram as your layout guide.
Step 2: Organise Hardware and Parts
Even tool-free furniture often includes small components like clips, dowels, shelf pegs, or cam locks. Losing a single piece can prevent assembly or compromise stability. Lay everything out in a logical order before you begin.
Create a simple checklist by photographing the contents of each box as you unpack. This serves as proof of what arrived and helps you spot missing pieces immediately. For larger furniture systems, number each component with masking tape to match the instruction manual.
Step 3: Read Instructions and Plan Alignment
Read through the entire assembly process before touching any components. This prevents surprises and helps you understand the logic of how pieces fit together.
Most modern flat-pack furniture uses visual instructions rather than written steps. Look for numbered arrows showing the direction of movement. Red or highlighted lines often indicate which surfaces are the front or top. Pay special attention to any warnings about orientation or alignment, as some joints only work in one direction.
Step 4: Assemble Components Using Interlocking Methods
Begin with the base or frame, as specified in your manual. When inserting a tab into a slot, use steady, even pressure rather than sudden force. If you feel significant resistance, stop and check the alignment. The joint should slide together with moderate pressure.
Once the joint is fully seated, verify that it's locked by attempting to pull the components apart gently. They should be firmly connected. For snap-together systems, press the clip or tab straight into the receiving slot until you hear or feel a click.
Step 5: Check Stability and Structural Integrity
Once all major components are assembled, test the structure before moving it. Push gently on different parts of the furniture, the sides, the top, the shelves. It should feel solid and not flex or wobble excessively.
Place a spirit level on horizontal surfaces to verify they're truly level. For tall furniture like bookcases or wardrobes, ensure it's stable enough that you're comfortable leaning against it. If it feels unstable, verify that all joints are locked and the base is fully assembled.
| Assembly Step | Time Required | Key Focus |
|---|---|---|
| Prepare space | 5 minutes | Clean, flat surface; clear layout |
| Organise parts | 5 minutes | Inventory check; prevent lost pieces |
| Read instructions | 10 minutes | Understand assembly sequence |
| Assemble main structure | 15-30 minutes | Steady pressure; verify alignment |
| Check stability | 5 minutes | Test joints; verify levelness |
Tool-Free Furniture Assembly in Australia: What's Available
Australia's furniture market has embraced tool-free assembly, particularly among retailers targeting renters and frequent movers. Koala Furniture offers sofas, bed bases, and storage pieces with interlocking components and click-together mechanisms. Eva produces bed frames with tool-free assembly in under five minutes, using FSC-certified timber. Pop Living specialises in modular wardrobe systems with a four-step assembly process requiring no tools. The Family Nest curates a selection of tool-free and easy-assembly furniture pieces designed to make moving and updating your home painless, with free shipping, reliable support, and a 30-day return policy.
IKEA Tool-Free Assembly Options and Ready-to-Assemble Alternatives
IKEA's BESTÅ system uses click-together cabinet doors and interlocking shelving, though many IKEA pieces still require an Allen key for final assembly. Fuzl, a UK-based company, produces modular furniture with magnetic interlocking systems designed for renters and frequent movers. Clikt, available in Australia, creates click-together event and display furniture with modular designs and flat-pack shipping.
The key difference between IKEA's RTA offerings and dedicated tool-free brands is the engineering philosophy. IKEA optimises for cost and flat-pack efficiency, often requiring some tools for final assembly. Dedicated tool-free brands optimise for actual assembly experience, eliminating tools entirely.
Furniture Assembly Hacks: DIY Solutions When Tools Are Missing
Sometimes you inherit furniture without instructions, or you're missing a key component. A few household items can substitute for missing tools or help you overcome assembly challenges.
Using Household Items as Assembly Aids
A rubber mallet or hammer with a soft head can help seat stubborn interlocking joints. Wrap the mallet head in cloth to avoid damaging the furniture surface. A wooden block placed against the joint and struck gently distributes force evenly and reduces the risk of cracking.
For joints requiring precise alignment, use a thin shim to hold components in position while you complete adjacent joints. A spirit level, or even a glass of water placed on a shelf, helps you verify levelness without specialised tools.
Visual Troubleshooting for Common Joint Issues
Joint won't align: Check that both components are oriented correctly. Interlocking joints only work in one direction. If alignment looks correct but the joint still resists, the components may be damaged.
Joint feels loose after assembly: The connection may not be fully seated. Apply steady pressure and push the components together again until you feel resistance.
Visible gap between components: This usually indicates misalignment. Gently separate the components and reposition them, checking the instruction diagram carefully.
Cracked or splintered wood around the joint: The component is damaged and should be replaced. Attempting to glue or reinforce a cracked joint creates a weak point that will fail under normal use.
Modular Furniture Australia: Flexibility and Easy Disassembly
Modular furniture systems appeal to renters and anyone who moves frequently because they're designed for disassembly. Unlike traditional furniture, which is often damaged during moves, modular pieces can be taken apart and reassembled multiple times without degradation.
The best modular systems use the same interlocking and snap-together mechanisms that make initial assembly easy. EverBlock Australia offers modular plastic block systems that interlock without tools, allowing endless configurations for shelving, storage, or room dividers. For renters, modular systems mean you can take your furniture with you when you move without leaving holes or damage in your rental property.
Ergonomic Assembly Techniques and Safety Tips
How you assemble furniture matters as much as what you're assembling. Poor technique leads to back strain, hand fatigue, and mistakes that compromise stability.
Protecting Your Back and Joints During Assembly
Keep your back straight when lifting components. Bend at your knees, not your waist. For larger pieces, get a helper to avoid injury and mistakes. Work at a comfortable height, a waist-height work surface is ideal. If your floor is your only option, kneel rather than bend forward.
Take breaks. Assembly doesn't need to happen in one sitting. Spreading the work across two sessions reduces fatigue and improves accuracy. For components requiring sustained pressure, use both hands and alternate sides to prevent repetitive strain injury.
Safety Considerations for Tool-Free Furniture
Keep small components away from children and pets, as clips, dowels, and fasteners are choking hazards. Ensure your assembly area is well-lit to prevent misaligned joints and mistakes. Verify that your floor is stable before beginning, using shims to level the base if needed.
Once assembled, test the furniture's stability before using it. For tall furniture, consider securing it to the wall using appropriate brackets, especially if you have children or pets that might cause the furniture to tip.
Assembling furniture without tools doesn't have to be stressful or time-consuming. With the right preparation, understanding of how interlocking joints work, and proper technique, you can build sturdy, stable furniture in a fraction of the time traditional assembly requires. The Family Nest's curated selection of easy-assembly furniture pieces combines quality materials with straightforward installation, featuring free shipping, reliable support, and a 30-day return policy that takes the risk out of your purchase. Whether you're furnishing a new apartment or updating your space, tool-free assembly transforms the experience from frustrating to genuinely enjoyable.
Frequently Asked Questions
What are the main types of tool-free assembly mechanisms used in furniture?
Tool-free furniture typically uses interlocking joints, wedge dowels, clips, tabs, and snap-together systems. Interlocking joints feature tongue-and-groove profiles that lock along the entire length, creating strong connections. Clips and tabs slide into pre-drilled slots, whilst snap-together mechanisms use friction fit or angled panels that click into place. Ready-to-assemble (RTA) furniture from brands like Koala and Eva in Australia often combines these methods for fast, secure assembly without fasteners or hardware.
Can you really disassemble and reassemble tool-free furniture multiple times?
Yes, most tool-free furniture can be disassembled and reassembled multiple times without damage, making it ideal for renters and frequent movers. Interlocking joints and snap-together systems are designed for repeated use. However, friction-fit connections may loosen slightly over time with repeated assembly cycles. To maintain structural integrity, avoid forcing panels during disassembly and store components in a dry environment. Modular furniture Australia brands like Pop Living specifically design their systems for easy reconfiguration.
What should I do if I'm missing tools or hardware when assembling furniture without tools?
Most tool-free furniture requires no tools by design, but if you're missing clips or connectors, household items can help temporarily. Rubber mallets (or wrapped hammers) assist with aligning tight-fitting joints without damaging surfaces. For missing fasteners, contact the furniture retailer for replacements before assembly. If alignment is difficult, soft cloths prevent scratching panels. Always refer to the instruction manual first, it's designed specifically for the assembly sequence and may provide workarounds. The Family Nest includes comprehensive guides with every purchase.
How do I know if my assembled furniture is stable and safe to use?
After assembly, test stability by gently pushing on the furniture from multiple angles, it should not wobble or shift. Check that all interlocking joints are fully seated and clips are fully engaged. Verify pre-drilled holes align correctly and no panels are loose. For load-bearing furniture like shelves or beds, place weight gradually and listen for creaking, which indicates poor joint contact. If instability occurs, disassemble and realign components, ensuring tabs fully enter slots and wedges are properly positioned. Quality brands like Eva and Koala design for maximum stability.
What's the difference between tool-free furniture and traditional flat-pack assembly?
Tool-free furniture eliminates the need for screwdrivers, Allen keys, and fasteners, using interlocking joints and snap-together connectors instead. Traditional flat-pack furniture requires hardware and tools for assembly, taking longer and creating frustration. Tool-free assembly typically takes minutes rather than hours, produces no visible fasteners for cleaner aesthetics, and is easier to disassemble for moving. Ready-to-assemble (RTA) furniture from Australian brands prioritises speed and simplicity, whilst maintaining structural integrity through engineered interlocking systems.
This article was written using GrandRanker